|
The
Steinberger Transposing Tremelo | |||||||||||||||||||||||||||||||||||
|
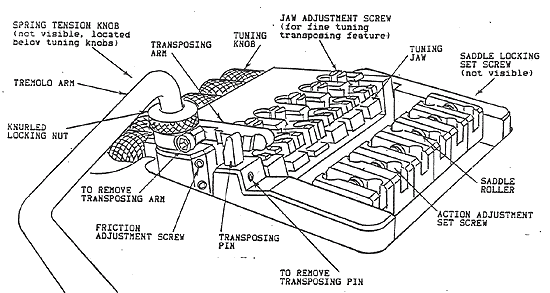
1. INSTALLING TREMOLO ARM:
To
install, spin arm clockwise into threaded hole, a minimum of four full
turns. When arm is screwed in almost to desired position. tighten knurled
locking nut firmly down. Tighten both arm and nut together for about 1/8th
turn more to lock into position. 2. TO USE TREMOLO: Rotate arm into playing position and use normally. 3. TO TRANSPOSE: Drop arm down, then turn clockwise to engage D, C, and B tunings. Pull arm up and turn clockwise to engage F# and G tunings. To disengage, rotate arm counter-clockwise. 4. TO TUNE: First lock tremolo in center E position by rotating arm clockwise. Then tune individual strings with small knobs as you would normally. ALWAYS LOCK TO TUNE! 5. TO ADJUST TREMOLO RETURN: After unit is tuned, as in step 4 above, rotate arm counter-clockwise to disengage center lock. If tremolo moves and does not remain in tune, turn SPRING TENSION KNOB at bottom of guitar to adjust to pitch as required. Tremolo should not move or change pitch when going in and out of locked position. Additional tremolo positions of Eb and F are possible by further adjustment of the spring tension knob. 6. ACTION AND INTONATION: First
unlock the saddles with side set screw. | |||||||||||||||||||||||||||||||||||
| |||||||||||||||||||||||||||||||||||
If a string does not maintain tune according to this chart, the tuner jaw must be adjusted up or down. Use the key provided, a small screwdriver, or a coin to adjust the screw located just behind each jaw. Turn clockwise to move jaw down, counter clockwise to move jaw up, according to the following procedure: 1) Set transposing arm up 1 step and tune with knobs according to chart. (Example: "E" string should be "F#" in the 1st step up position). 2) Transpose to 2nd step down and check new pitch with chart. (Example: "E" string should be "C" in 2nd step down position). 3) Adjust jaw height in the lower position only. It pitch is flat, lower jaw by turning the screw (located just behind the jaw) clockwise. If pitch is sharp, raise jaw by turning the screw counter-clockwise. 4) Repeat steps 1 through 3 until pitch is correct in both positions. Always use the knobs only to tune in the up position, and the jaw screws only to adjust the pitch in the lower position. All other transposing positions should be automatically in tune when the 1st up and 2nd down positions are properly adjusted. NOTE: CALIBRATED transposing strings are required for best results. Improperly calibrated strings will not track well with each other, so the tuning will not be accurate in all positions. This process is greatly facilitated by use of a chromatic electronic tuner. With an electronic guitar tuner with only 6 intervals, find on your transposing chart the steps for each string that are tuned to E,A,D,G, or B and use these intervals to set transposing feature. (For best accuracy, use steps that are furthest apart) While this adjustment may be a bit confusing at first, it is really very easy once you get use to it. 8. TO REPLACE STRINGS: To remove, loosen tuning knob until string is loose and ball can slide up and out of jaw. ( "B" and "G" string balls are deep in saddles and restricted from upward movement by a small lip. Simply move ball back in jaw and lift to remove). To install strings, align string
ball with hole in jaw, and push ball down as far as it will go. (On "B"
and "G" strings, balls must be pushed below small internal lip, and should
then pull up on lip for most stable operation). After rough tuning, push
tremolo all the way up and down several times to set strings, then fine
tune and adjust transposing feature as needed. | |||||||||||||||||||||||||||||||||||