![]() TIPS & INFO
TIPS & INFO
An assortment of helpful tips
& background for setup & use.
The first thing you need to do is plunk down money and buy the right strings. Though they may seem like a bargain, you'll need to stay away from the MusicYo brand for TransTrems - they're passable for beginners on the inexpensive R-Trem but totally unacceptable for TT's.
Another necessity is the use of a good chromatic tuner. You don't need a rackmount one, as today's smaller/cheaper units will give you accurate readings. If you don't use a chromatic tuner, small tuning inaccuracies (even if just a few cents) can get magnified when transposing. These days reliable ones can be had for $50 and used rackmount ones for under $100. No excuses not to have one.
The final key to success is the use of "calibrated" strings.
What does the term "calibrated" mean?
When Ned originally designed the TT he had to establish some basic rules of operation. The first of these was that the double-ball end strings needed to be an exact length. This would position the larger ball end at a precise location within the bridge assembly, and provide the ideal rotational angle point (or more accurately the distance of movement) to transpose.
This is the scientific basis for how the TransTrem works. If you'll notice, the pivot points of the bridge are asymmetrical. This makes the bridge rotate at an angle (rather than directly parallel to the strings like on most other trems) when engaged. This slight angle stretches each string a different distance, which results in a varying rate of tension change for each one (more for the low E, less for the high E). This provides the transposing. There were obviously a lot of equations (and trials & errors) in figuring this stuff out. There were attempts thoughout the years to build trems that transposed (it's not a new idea), though none locked in place in the various keys. Ned's overall approach was radical and inspired genius.
This precise transposing action requires exacting specs on the string length. If the strings are too long the transposed notes are flat - too short and they're sharp. The farther you go out from the center unlocked position the worse it gets. Because tension on each string varies (due to construction, gauge & frequency differences) the ideal length of each string is also different for each manufacturer
Ned chose the term "calibrated" to define strings that are the precise length needed to transpose properly. A calibrated string is technically within 1/16" of his specification when tuned; that is within .0625" of it's ideal length. Any more than that and the string won't transpose. Ned did build a "fudge factor" into his bridge - the fine transposing tuners allow you to compensate for any minor, real-world variations in actual length. This term "calibrated" is not trademarked nor proprietary. Ned intentionally shared it to allow any manufacturer to use the term (and the underlying processes to determine it). His hope was that it would offer the widest variety of options to his customers.
Understand that not all double-ball strings are calibrated. The process of determining the calibration spec is different for each maker, depending on their construction techniques. There is an exacting process (usually including lots of testing) to measure. But once the calibration is set for a specific string, the manufacturer can then make thousands of them to that precise length. As long as they don't change any major factors (type of metal, core diameter, wrap diameter, # or wraps, etc.) the spec remains constant.
Ned actually made a custom headpiece that he could use to quickly check the lengths of the strings and tell how far in/out of spec they were. For a time the company regularly tested each manufacturers strings. Once Gibson bought the company this process slowly went away and hasn't been done for many years. Ned still has that headpiece, and just recently has started helping us by testing strings and working with the manufacturers again (most notably D'Addario). Mind you he doesn't get a dime for this - he does it to help those who've come to buy and enjoy his namesakes.
A close-up photo of Ned's custom calibrating headpiece.
It was not a production piece, so the steel was never coated (hence the rust).
Click on the photo for a detailed view.
So what strings should I buy?
For guitar we know of only two manufacturers who make properly calibrated strings: LaBella (the "official" Steinberger string maker) and D'Addario. LaBella designates "calibrated" on sets designed for use with the TT. If you don't specifically see that word on a LaBella set don't assume they are calibrated - they probably aren't. Unfortunately D'Addario strings don't say calibrated anywhere. But because they have a limited selection of double-ball strings they've decided to make all of their sets are calibrated. We've spoken to the folks at D'Addario about this and expect to see the term "calibrated" printed on their packaging to clear up any confusion in the near future.
The vast majority of reports from experienced TT players indicates these are the only 2 string brands to use. LaBella has a wider variety of gauges and types, but D'Addario's seem to be a little cheaper in price.
For the bass TransTrem, LaBella was the only known source for calibrated TT bass strings. Best guesstimates are only 200 bass TT's were ever made, so the market for these is quite small (and probably shrinking as time goes on). In late 2000 LaBella discontinued production of calibrated bass strings (retailers sold out in mid 2001), and will not accept new orders even on a custom basis. We're currently working with D'Addario to get their bass strings calibrated.
See our Links page for bookmarks to the string manufacturers and recommended retailers.
What gauges of strings can I use?
The TransTrem was originally designed to use .009 sets. To market to a wider owner base (and because the trem could handle it) the use of .080's & .010's was quickly added. Almost all standard sets of .008's, .009's and .010's - regardless of the top string used (.042, .045, .046) - will work properly.
But what if you really love the big tone that 11's provide? The increased tension from these larger gauges causes a major problem: the trem spring (which counteracts the tension of the strings) gets too compressed. This limits the trem's range of motion and often makes transposing to the outer positions impossible. But there is a solution.
An enterprising fellow, Lou Larson, was in this same predicament - he enjoyed playing 11's but couldn't use them on his TT equipped GL's.. His father happened to be an engineer. So Larson had his dad do the precise tension calculations that a .011-.050 gauge set produces. From these calculations he had a batch of 100 springs custom made. The original trem spring installed at the factory was/is a standard off-the-shelf medium duty die spring (click here to read more). Actually he over-engineered them by about 5%, that way the trem wouldn't easily go out of tune when bumped.
Larson still has many springs left for sale. Last time we checked (1/02) he was selling them for $15 + shipping. Those who've used them say installation isn't too complicated (if you're handy) and the sonic change is very noticeable. If you really like the meaty tones 11's give we suggest you try one.
Click here to email Lou for an .011 TransTrem spring.
What types of strings can I use?
LaBella makes both stainless and a few nickel sets. D'Addario offers only nickel and has no immediate plans to offer stainless. All of them work fine - choose whichever sounds best to you.
I see these LaBella "threaded" ball end strings. What are
they? Do I need them?
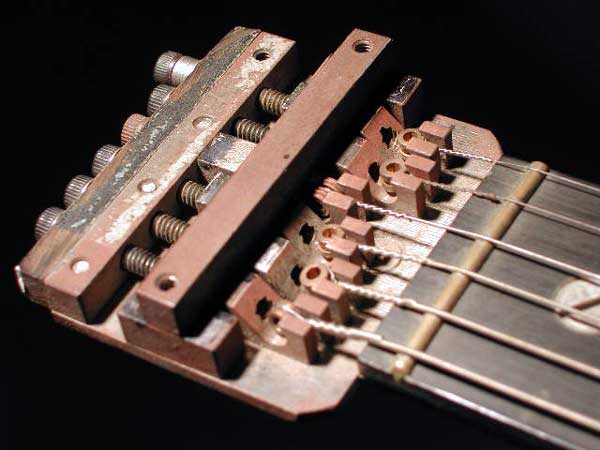
The first version of the TransTrem (now known as a Type1) was designed to use threaded ball ends in the bridge. This allowed for the fine tuning of the transposing feature, as screwing the ball in or out moved the string up or down and thus varied the string length. But with the luxury of hindsight, even Ned admits that it was not the most graceful solution
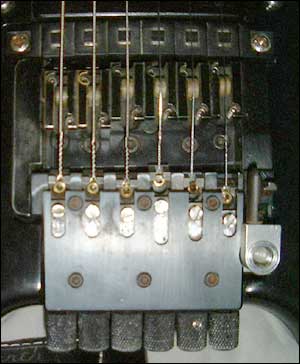
Front on view of a Type1 TransTrem
The biggest complaint about this design came during string changes. Once the trem was set up it worked great. But the fine tuning part (the ball end) had to be removed and then reset again each time you changed a string.
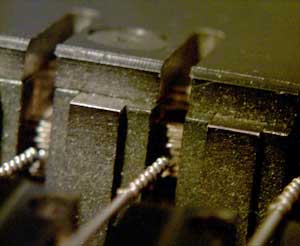
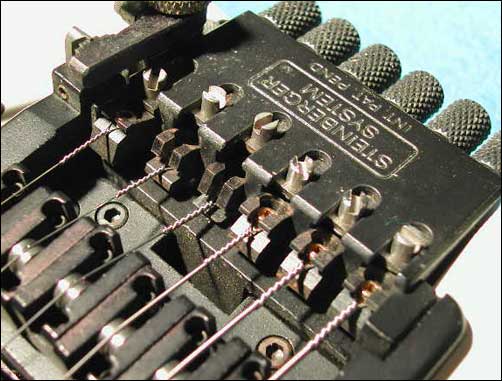
Close-up of the the threaded ball inserted in
a Type1 TT
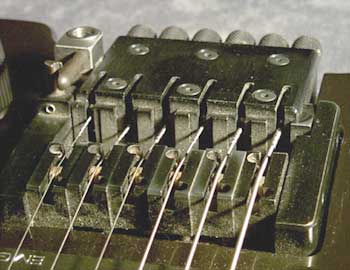
After a few years Ned redesigned a version 2.0 trem (known as a Type2). A major change was the addition of fine tunings jaws which separated the transposing adjustment from the ball end itself. This allowed the use of regular ball ends for the manufacturers, and meant the fine transposing settings would remain set when the string was removed. Retuning after string changes became much easier. This Type2 TT was introduced in the late 80's, and all instruments manufactured up until production ended in 1998 featured this upgraded design.
A Type2 Zen-On made TransTrem
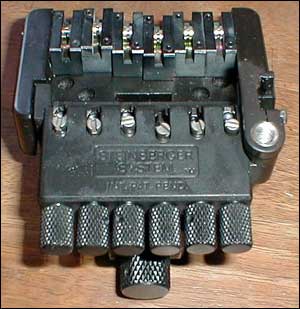
For previous owners Type 1 owners frustrated with threaded ball end strings Steinberger offered an upgrade. You shipped your guitar (or just the bridge) to the factory, and they replaced the jaws and either re-milled or replaced the bridge top plate. Bridges that have been upgraded are said to have the "trem retro mod". For some this offers the best of both worlds: the milled steel components of the Type1 trems add tone and sustain and the Type2 intonating jaws ease the hassle of string changes. Most trems were upgraded, and it's estimated perhaps less than a hundred original unmodified Type1 trems are still out there. Since the plant is closed Gibson no longer offers the upgrade for older unmodified Type1 trems.
A Type1 retro bridge
The pictures in this section should be a guide to what bridge you own. If it's a Type2 or a Type1 "trem retro" then you've got the newer jaws and the standard sets of calibrated strings are what you order. If you still have the original factory unmodified Type1 TT, then you must order threaded double ball-end calibrated strings. Only LaBella makes these.
How do I start?
As mentioned before the key to transposing is the slight movement of the ball end, which in turn stretches each string with a different amount of tension. If you look closely at the jaws you'll notice that they are not all exactly the same. Some have the ball placed more at the top of the jaw (high E), the bottom (B and G even deeper) or more in the middle (low E, A & D). This ball-end placement is a refined part of the engineering equations for transposing each string.
NOTE - If you ever need to buy a replacement TT jaw, you'll need to know which string it's for. Installing the wrong jaw will prevent the trem from transposing properly on that string.
What's also interesting to note is that each jaw is designed to have it's own "home" - that is there's a pattern to where each one should be for a correctly set up TT. Knowing these points can give you a head start when first setting up and make the process go much faster.
We asked for Ned's help on this and he supplied several digital pics from one of his own guitars. This TT pictured below was configured by "the man" himself for ideal operation. Feel free to use the following pictures as a guide when setting up yours. What should be noted here is the both the vertical (up/down) and, perhaps more importantly, the horizontal (front/back) position of the jaws. First place them in the approximate vertical positions you see below to speed up the tuning process.
Angled view of the jaws.
Click on pic for close-up view.
Nearly front on view; more helpful for reference.
Note the up/down location of each jaw.
Click on pic for close-up view.
When you get the jaws roughly set up according to the pics above, put the strings on and follow the formal tuning instructions next. When the strings are on and tuned to pitch with the regular bridge tuning knobs (at the bridge end) it should look like the following:

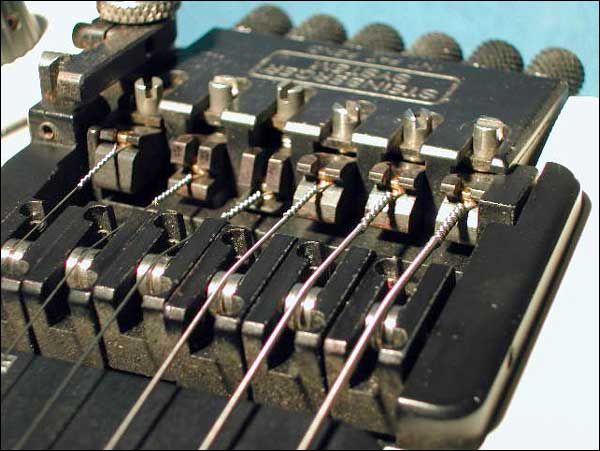
Overhead shot of the entire bridge.
Note the front/back position of each jaw.
Click on pic for close-up view.
This is how it should look right before you get to the actual transposing adjustment in the directions.
The picture above is crucial. Though you can obviously look at the jaws themselves, noticing the stainless adjustment screws gives a little better contrast for reference. Note that the low E, A & D string jaws are all basically in a line, a little forward of middle position. Next the G is way back, the B a little in front of that and finally the high E is way up front. If your jaws don't line up in this general pattern it's likely that the ball end will be in the wrong place, and the string won't transpose properly. If any one string is way out of whack, replace it with a new one from another set.
Once it looks like this move on to the detailed transposing directions.
NOTE - Once you have your TransTrem calibrated, changing strings usually requires only minor corrections. However if this is a new instrument (or used and therefore new to you), if it's been a long time between string changes, or if you change the type or gauge of string you're using, you'll probably need to start from scratch and reference these photos.
Make sure you follow the directions!
Click here for the latest official & revised directions for correct TransTrem tuning & adjustment. These were created by Ned himself and were copied from his current company's website. If you want a version to save & print for later, click here to open, save and/or print an MS Word 97/2000 version (hit cancel if prompted for a username and password).
The key to success is following the general principles outlined. Yes there are a few ways of doing this but all seem to follow the same general principles. Novices would be wise to stay on the beaten path we show here. However, if you've found some helpful hints not included on this page please email us to share them.
IMPORTANT NOTE - The instructions you link to above may look identical to ones elsewhere, particularly on the Ed Roman / World Class Guitars website. DO NOT USE THOSE! Mr. Roman's are not complete. If you study this official version side-by-side with his you'll notice he leaves out one key step - how to properly adjust the transposing feature! It's the most involved step and is crucial to making it work properly. It's this specific type of selective "misinformation" on the web we started this site to address.
It's not working. . .
We have to admit, usually we're able to re-string a set in no time flat. But sometimes there was that one string that just won't transpose properly. We'd spend 15 minutes or more trying to get it right, adjusting back and forth, and still no luck.
You know what it is? It's usually a bad string.
Even with all of the quality control and automation at a plant one bad string (either too long or too short) can still get out once in a while. If the situation above sounds familiar, take a new string from another set (you always keep several news sets on hand don't you?) and try it. In 80% of the instances the problem disappears right away and the string tunes right up. Feel free to either throw the string out, or better yet contact the manufacturer and/or retailer about a replacement.
This small hint will save you lots of time and frustration if it happens to you. It took some time and discussion for a collective light bulb to go off over our heads on this one. So don't feel bad if it wasn't obvious to you either.
It's still not working. . .
Even after trying several sets of strings you still find you can't get the bridge to transpose properly. At this stage we often hear of a what we'll call a "return to zero" issue. This is when after transposing the trem will not "float" in tune. Often it "rides rough" when transposing or regularly comes back sharp or flat. Reports add that tapping the arm a bit usually brings it back in tune.
The first thing to check are the saddle rollers. These often can get gummed up or for other reasons just not roll properly. Remove the strings and see if all of the rollers move freely by hand. If you can't tell by hand, use a rubber band or piece of plastic or other material to run over them. There should be no sticking at any point along each roller's travel. If there is, try lubricating it then running it back and forth a bunch of times to work it in. If it's still not rolling freely you'll need to buy new saddles, have a specialist repair them, or try to fix/burnish them yourself. We won't go into that process here.
So you've checked the rollers. They work fine but the trem is still sticking. At this point some people think the spring might be worn out. In fact the spring is pretty heavy duty and is unlikely to be the first part on your unit to wear out.
A more likely culprit are the bearings.
The two pivot points of the TT consist of a bearing and shaft assembly that fit into milled holes in the bridge base and tremolo assembly. These are very small bearing units - only 10 mm in diameter x 4 mm wide. Like all bearings they have a tendency to wear over time. The bearings in a TransTrem (and the similarly designed non-transposing S-Trem) are especially prone to it. Most owners don't know the bearings even exist (they haven't ever taken the trem apart to see them) and rarely (or never) clean and/or lubricate them as is recommended for any bearing.
Another factor in the bearing wear is that technically it's the "wrong" component to use in this type of application. Bearings are primarily designed for rotational (around and around) use rather than the small back and forth arc the TT operates in. This limited movement keeps the ball bearings in a small path and they tend to wear grooves faster. The two signs of bearing wear are the behaviors we noted before - 1) the trem rides rough and/or 2) doesn't return to zero. It's one of the limitations of the design, but can be easily fixed. A pair of new bearings only costs about $4.
Click here for directions on finding and replacing your TransTrem bearings.
Can I lubricate my trem? What should I use?
If you replace your bearings with the sealed variety we recommend in the link above, then there's no way to lubricate them. For shielded or open bearings (and the other moving parts on your trem) we recommend the following products:
Tri-Flow - An industrial lubricant with Teflon added. Resistant to moisture in addition to it's lubricating properties. Can be found at most full service hardware and auto supply stores.
Click here to go to the Tri-Flow website
Hoppes Lubricating Oil - Designed for guns, this product will lubricate and protect the exposed metal on tremolos and internal moving bridge parts just as well. Can be found at local gun/hunting or sporting goods shops in addition to various online sources. They also offer a variety of other petroleum and polymer based lubricants.
Click here to go to the Hoppes website
White Lightning - Can be found in most local bike specialty shops. It's a "self-cleaning" polymer based lubricant designed for bike chains. The lubricant is held in a suspension with a wax, which provides long-term lubrication and protection from harsh moisture and dirt conditions. Some guys don't care for the waxy build up, but it does provide excellent long-term protection. Also good for other moving bridge parts (tuners, rods, jaws, etc.). Price is between $4 and $6 for a 4 oz. bottle which should last many years.
Click here to go to the White Lightning website.
Each of these manufacturers has links on their respective sites to both traditional brick-and-mortar and online retailers where their products can be purchased.
STAY AWAY FROM WD-40! Technically it's not a lubricant and won't provide the long term lubrication the bearings and other parts need. We've spoken with folks who've been using the three specific products we've mentioned above on their 'bergers for years. Choose whichever you prefer. Since you don't need to use much, even the smaller bottles will provide you a supply for many years.
One last string tip - solder those wraps!
One final tip we'd like to leave you with can save you lots of aggravation. . .and maybe even some money.
It's not uncommon for the high E strings (and sometimes the B) to break - often right after re-stringing. LaBella includes two high E's in their sets because of this very thing. From what we can tell there seems to be some weakness in the wrap area right at the ball end. Since LaBella are the most popular, we see it with those more often. But it's been reported on other brands too.
The most common result of this flaw is that the string simply breaks at the ball end when the trem is raised. A less common outcome is that the trem will work fine when set up, but the next time you take it out of the case the high E will be flat and the others sharp. In this latter instance the wraps seem to be actually loosening a tiny bit.
To combat both issues, we suggest you put a drop or two of solder on the wraps of the unwound strings prior to installing them. It doesn't have to be the neatest work, so long as you reinforce the wraps a little. It only takes a few minutes, and can save you loads of aggravation (and high E strings!) if you get into the habit.
Conclusion
We hope these tips make the maintenance and use of your TransTrem enjoyable and hassle free. If you're having some additional problems not listed here, or have some other specific questions join our Yahoo! Group. There's a bevy of knowledgeable Steinberger owners there with lots of experience who'll readily answer your queries.